Introduction to Kotlin on Android
Java is a very verbose language. The simplest tasks often require writing a lot of boiler plate code. Arguably, a lot of this code can be generated by IDEs like IntelliJ IDEA or Android Studio. Although, this eases the burden on the writer, it doesn't ease it on the reader. As a developer, you spend a lot more of your time reading code than writing it. This is where I find the additional cognitive overhead of boiler plate code has a habit of stymying development.
The Java language itself is constrained by its own popularity and the need for backward compatibility. To make matters worse, Android development does not support Java 8 at the time of writing. As a result, Java on Android lacks powerful features that are available in other languages; first class functions, data objects, option pattern (null safety), lazy evaluation, and extensions, to name a few.
Enter Kotlin, a language that offers all the above features and more. This post will cover how to get started with Kotlin in an Android project.
*Note: For those who are interested in why I chose Kotlin over other JVM languages (like Scala), I recommend reading [this article by Jake Wharton].*
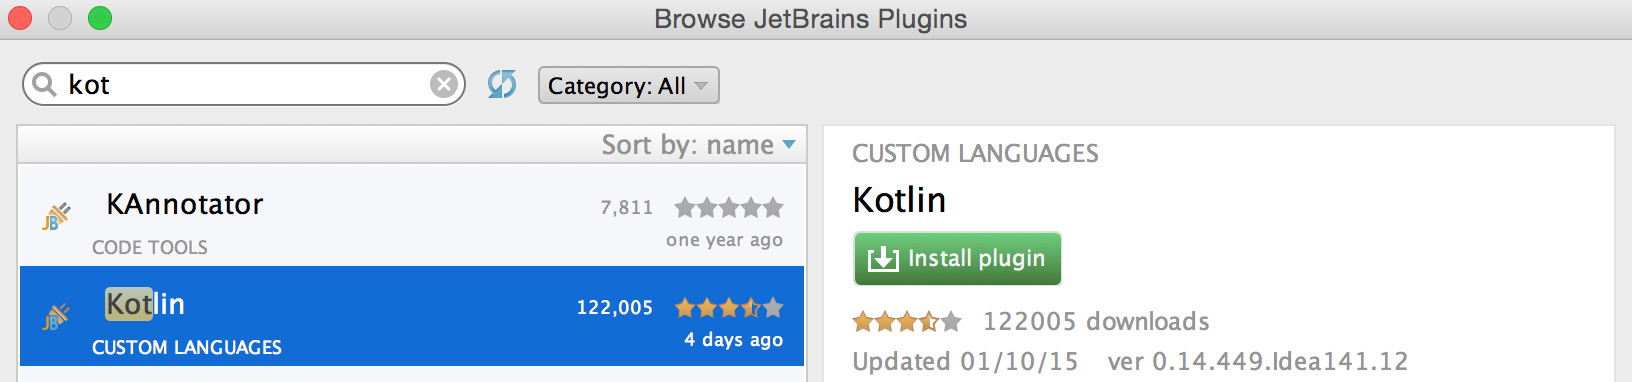
Step 1: Install the Kotlin plugin
Browse the JetBrains plugin repository for the Kotlin plugin. Install it and then restart Android Studio.
Step 2: Open an existing project
Open an existing Android Studio project and navigate to a Java file.
Step 3: Convert the Java file into a Kotlin file
Bring up the find action dialog ⇧ ⌘ A and type "convert". Select "convert Java File to Kotlin File", as shown below:

This will convert a Java file that looks like this:
@ContentView(R.layout.activity_answer)
public class AnswerActivity extends BaseActivity implements AnswerView {

    public static final String EXTRA_ANSWER_IS_TRUE = "EXTRA_ANSWER_IS_TRUE";

    @Bind(R.id.show_answer_button)
    Button showAnswerButton;

    @Bind(R.id.answer_text_view)
    TextView answerTextView;

    private AnswerPresenter presenter;

    @Override
    protected void onCreate(Bundle savedInstanceState) {
        super.onCreate(savedInstanceState);

        boolean isQuestionAnswerTrue = getIntent().getBooleanExtra(EXTRA_ANSWER_IS_TRUE, false);
        presenter = new AnswerPage(this, isQuestionAnswerTrue);

        showAnswerButton.setOnClickListener(showAnswerButtonListener());
    }

    @Override
    public void showAnswerIsTrue() {
        answerTextView.setText(R.string.true_button);
    }

    @Override
    public void showAnswerIsFalse() {
        answerTextView.setText(R.string.false_button);
    }

    private View.OnClickListener showAnswerButtonListener() {
        return v -> presenter.showAnswerPressed();
    }
}
Into a Kotlin file that looks like this:
@ContentView(R.layout.activity_answer)
class AnswerActivity : BaseActivity(), AnswerView {

    @Bind(R.id.show_answer_button)
    internal var showAnswerButton: Button

    @Bind(R.id.answer_text_view)
    internal var answerTextView: TextView

    private var presenter: AnswerPresenter? = null

    override fun onCreate(savedInstanceState: Bundle?) {
        super.onCreate(savedInstanceState)

        val isQuestionAnswerTrue = intent.getBooleanExtra(EXTRA_ANSWER_IS_TRUE, false)
        presenter = AnswerPage(this, isQuestionAnswerTrue)

        showAnswerButton.setOnClickListener(showAnswerButtonListener())
    }

    override fun showAnswerIsTrue() {
        answerTextView.setText(R.string.true_button)
    }

    override fun showAnswerIsFalse() {
        answerTextView.setText(R.string.false_button)
    }

    private fun showAnswerButtonListener(): View.OnClickListener {
        return { v -> presenter!!.showAnswerPressed() }
    }

    companion object {
        val EXTRA_ANSWER_IS_TRUE = "EXTRA_ANSWER_IS_TRUE"
    }
}
The converter works well most of the time. However, in this case it has run into a few minor issues that prevent the code from compiling. Firstly, we will need to change the [Butter Knife] injection fields from internal to lateinit:
class AnswerActivity : BaseActivity(), AnswerView {

    @Bind(R.id.show_answer_button)
    lateinit var showAnswerButton: Button

    @Bind(R.id.answer_text_view)
    lateinit var answerTextView: TextView

    ...
*Note: lateinit allows a non-null type to be initialized outside of a constructor. This is handy when using dependency injection frameworks.*
Secondly, we will need to cast the lambda to return View.OnClickListener:
class AnswerActivity : BaseActivity(), AnswerView {

    ...

  private fun showAnswerButtonListener(): View.OnClickListener {
    return View.OnClickListener { v -> presenter!!.showAnswerPressed() }
  }

    ...
Step 4: Configure Kotlin in the project
Bring up the find action dialog ⇧ ⌘ A and type "configure". Select "configure Kotlin in project", as shown below:

This will add the appropriate dependencies to your module's build.gradle file.
Step 5: Compile the App
Compile the code and you should have a working app that has one of its classes written in Kotlin. Hopefully, that's enough for you to get started. For more examples, feel free to check out this Kotlin Android app github repository.
*Note: This post only scratches the surface of what Kotlin has to offer. I plan on convering more of the exciting features in later posts.*